Automatic Wi-Fi connectivity checker & reconnect script

I often find myself using various remote access tools to control kiosk and digital signage displays around the country, many of these devices are connected via wireless cards. Assuming the router is up, it can, from time to time be necessary to restart the wireless NIC, not an easy task to do if you’ve already lost connectivity. I first used this on Windows XP using the DevCon command-line utility, the script just pings Google and if the ping is successful nothing happens, if not it disconnects the WiFi connection, waits 5 seconds and attempts to reconnect.

This set of instructions is for Windows 7, I believe this would work in Windows 8 but I haven’t tested that, Windows XP instructions can be found in the comments, along with a URL to for the required files.

What you need to complete this:

For starters, you need a WiFi card, if you don’t have one integrated into your CPU here is a cheap wireless N card that’s compatible with more Windows flavors and works well, Medialink- 150Mbps Wireless N USB Adapter – XP / Vista / Windows 7 & 8 Compatible

1) SSID of Wireless Network (CaSe Sensitive)

C:\>;netsh wlan show networks

2) Wireless Profile Name (CaSe Sensitive)

C:\>;netsh wlan show profile

3) Name of Wireless Interface (CaSe Sensitive)
C:\>;netsh wlan show interfaces

Now with those three pieces of information you should be able to run the following command (remember these are CaSe Sensitive) my assumptions are:

1) your SSID name is: My Wireless Network

2) Your profile name is: My Wireless Network

3) Your interface is: Wireless Network Connection

C:\>;netsh wlan connect ssid=”My Wireless Network” Name=”My Wireless Network” Interface=”Wireless Network Connection”

If that works, move on to test the disconnect, if it doesn’t work you probably missed my four previous comments about these Interface/profile and SSID names being case sensitive.

C:\>;netsh wlan disconnect interface=”Wireless Network Connection”

Next you need to create the script, open notepad and add this text to the document

REM Restart Wireless Connection
REM Don’t restart if ping works.
ping -n 1 google.com
if %errorlevel% EQU 0 goto end
netsh wlan disconnect interface=”Wireless Network Connection”
TIMEOUT 5
netsh wlan connect ssid=”My Wireless Network” Name=”My Wireless Network” Interface=”Wireless Network Connection”
:end

Save the document as restartwireless.bat (make sure you put the .bat otherwise you are just saving it as a text file and we need a batch)

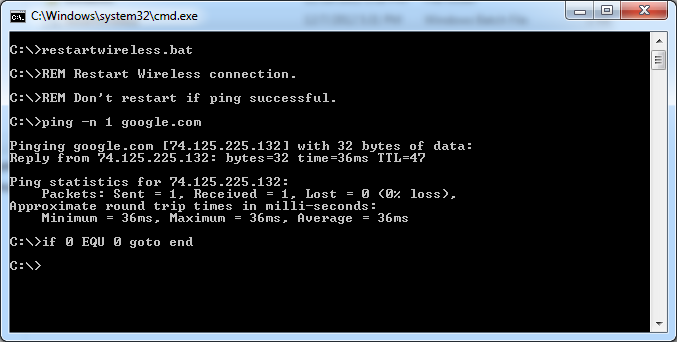
It’s probably not a bad idea to open the command prompt, navigate to where you saved the new batch file and run it by typing

restartwireless.bat

Make sure you test this both with you WLAN connected and disconnected to make sure it works both ways. Provided that works, all you need to do is schedule the script to run periodically using Windows Task Scheduler. You could have the script run every hour, or once a day, lots of settings you could tweak there, might want to make sure you run the task with elevated privileges in the task scheduler.
Configuring OpenVPN on a Micro AWS instance

The results are in, running OpenVPN on an AWS Micro instance works flawlessly, with the one exception that Apple does not have support for OpenVPN, only L2TP, PPTP, and IPSEC unless you jailbreak your phone.

OpenVPN on Micro AWS Instance

I had planned on writing instructions on how to setup AWS on a free Micro instance but a very nice set of instructions already exists here (run the commands under the root account, Sudo will only cause problems)

http://ubuntuguide.org/wiki/OpenVPN_server

Micro instances on AWS are free up to 750 hours (that’s 24/7) and 15GB of bandwidth (across all AWS services).  If you wanted you could create a cron job to shutdown the instance and then turn it on when you needed it (via a nice app on your smartphone) you could preserve your micro instance hours.

Also, make sure you open the right ports on the Ubuntu AMI, (TCP 443, TCP 943, UDP 1194) and of course don’t forget SSH 22 so you can access your server.

Straight form OpenVPN

Long answer: By default OpenVPN Access Server has 2 OpenVPN daemons running. One of them on UDP port 1194 and another on TCP 443. We recommend that you use the UDP port because this functions better for an OpenVPN tunnel. However, many public locations block all sorts of ports except very common ones like http, https, ftp, pop3, and so on. Therefore we also have TCP 443 as an option. TCP port 443 is the default port for https:// (SSL) traffic and so this is usually allowed through at the user’s location.

TCP port 943 is the port where the web server interface is listening by default. You can either approach this directly using a URL like https://yourserverhostnamehere:943/ or by approaching it through the standard https:// port TCP 443, since the OpenVPN daemon will automatically internally route browser traffic to TCP 943 by default. (https://yourserverhostnamehere/).

The only thing I would recommend is setting a root password and changing to root before following the guide above

sudo passwd root

Set a root password when prompted and then changing to the root account before beginning

su

Enter the newly created root password when prompted.  The reason I suggest this is that you cannot run ./vars without root access and sudo ./vars will fail, change to root and save the trouble.


Cancelling Postini to use Google Apps

** Update 12/3/2012 **

It only took a few days, the domain was released from Postini and we were up and running on GApps in no time. Some things to I learned when we migrated from Exchange to Google Apps….

  1. You cannot attach documents from outlook on meeting notices
  2. Group emails do not get sent to to the sender, even if they are on the distribution list
  3. Not having to maintain an Exchange server is worth it

** End Update **


After trying to signup for Google Apps and being denied because of an existing Postini account we use on this domain for message filtering I began to do some homework.  It turns out, if you have a Postini account you need to cancel that account before you can sign up the domain for Google Apps, lets not forget though, Postini is a Google product.

I completed the online support ticket to cancel the account and then searched around for some more information on how long this takes.

Which lead me to the Google Postini product forum (http://productforums.google.com/forum/#!topic/postini/UqpJ5rB9GOA[1-25]) some users are claiming this process can take 60+ days…

Despite being contacted by a Google representative to send in a Letter of Authorization (which I did) shortly after my online support request, I’m not convinced this will be an expeditious process, which is surprising because we don’t get a refund (message filtering is already built into Google Apps) and we are signing up for additional services, it’s a win-win for Google.

Hopefully we will be pleasantly surprised and our domain will be released this week.  Exchange 2010 is a great improvement from 2007/2003 but without a dedicated Exchange admin and an IT staff already taxed to capacity, moving this service to the cloud is long overdue.